Schnittker
Member
We talk a lot about "knowing how to read pressure signs", but as I think about it, I dont recall ever seeing a tutorial on it. I just kind of figured it out over time. If others did the same, then I bet we have all learned some different ways that we can share with each other.
Each rifle is different on their tolerances and so pressure signs will likely show up different from one rifle to another, but I will share the way I interpret the signs from my experience with my loading.
This is a really important topic for this forum in particular since we are playing with bullets that have no load data and we all need to build up our own safe loads for our rifle and application.
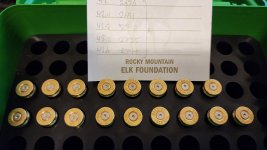
I know some folks do some measurements of the base or ejector groove, but I usually just inspect the primer.
A low pressure load will have a firing pin dent that is rounded and the primer corners will have about the same rounded shape as they were when the primer was new.
A little higher pressure and I start to see a little ridge around the firing pin dent. Certainly how much of a ridge depends on the thickness of the primer cup (brand of primer) and the shape of the firing pin dome (make of rifle). I just rake my finger nail across the pin dent, and feel if there is a ridge there and estimate how tall. I have seen factory ammunition have a little ridge, and so I dont consider this to be so bad.... unless it starts to get pretty tall.
At higher pressures, I see the ridge around the firing pin dent get tall. Also the primer looks "flattened". Instead of the nice rounded corners on the edge of the primer, the primer now looks larger and the corners look sharper. It was only after taking pictures for this post that I realized what is really happening when that is observed. Its the primer cup trying to fill the chamfer on the case primer pocket.
Then add a bit more pressure and the seal between the primer and the primer pocket starts to fail. In this case the flattened primer kind of acts as a safety feature since the expanded corner helps to seal the gasses. You will see this when the spent primer is removed from the case, and you will find carbon residue on the side of the primer.
Then, if pressure is further increased you may actually get gas leakage. This will leave carbon on the case head and bolt face. You could even get a blown out primer. That said, I think this is more often a consequence of worn out primer pockets since in my most recent loads I got gas leak before I got sticky bolt. I later checked my brass with a no-go gauge and found some others that were too loose and discarded them.
Oh, and for those that dont know, "sticky bolt" is the phrase used that after firing the cartridge its hard to lift the bolt. This is because the case did not spring back enough to its smaller shape after expanding from the explosion and now is kind of stuck in the chamber and so its takes a bit of work to get it un-stuck.
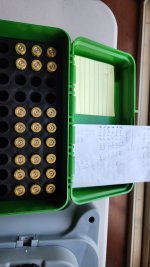
Here are my pics which I hope help those that are learning.
I also welcome others input on pressure signs so that I can learn as well.


Each rifle is different on their tolerances and so pressure signs will likely show up different from one rifle to another, but I will share the way I interpret the signs from my experience with my loading.
This is a really important topic for this forum in particular since we are playing with bullets that have no load data and we all need to build up our own safe loads for our rifle and application.
I know some folks do some measurements of the base or ejector groove, but I usually just inspect the primer.
A low pressure load will have a firing pin dent that is rounded and the primer corners will have about the same rounded shape as they were when the primer was new.
A little higher pressure and I start to see a little ridge around the firing pin dent. Certainly how much of a ridge depends on the thickness of the primer cup (brand of primer) and the shape of the firing pin dome (make of rifle). I just rake my finger nail across the pin dent, and feel if there is a ridge there and estimate how tall. I have seen factory ammunition have a little ridge, and so I dont consider this to be so bad.... unless it starts to get pretty tall.
At higher pressures, I see the ridge around the firing pin dent get tall. Also the primer looks "flattened". Instead of the nice rounded corners on the edge of the primer, the primer now looks larger and the corners look sharper. It was only after taking pictures for this post that I realized what is really happening when that is observed. Its the primer cup trying to fill the chamfer on the case primer pocket.
Then add a bit more pressure and the seal between the primer and the primer pocket starts to fail. In this case the flattened primer kind of acts as a safety feature since the expanded corner helps to seal the gasses. You will see this when the spent primer is removed from the case, and you will find carbon residue on the side of the primer.
Then, if pressure is further increased you may actually get gas leakage. This will leave carbon on the case head and bolt face. You could even get a blown out primer. That said, I think this is more often a consequence of worn out primer pockets since in my most recent loads I got gas leak before I got sticky bolt. I later checked my brass with a no-go gauge and found some others that were too loose and discarded them.
Oh, and for those that dont know, "sticky bolt" is the phrase used that after firing the cartridge its hard to lift the bolt. This is because the case did not spring back enough to its smaller shape after expanding from the explosion and now is kind of stuck in the chamber and so its takes a bit of work to get it un-stuck.
Here are my pics which I hope help those that are learning.
I also welcome others input on pressure signs so that I can learn as well.
Last edited: